In this article you will find all the basic information on where to start from with our
Reseller Hosting Service.
The following items are to be explained here:
1. Package Information
- Welcome Guide Email
- Email with Addons
2. Preparing the Domain Name
- How to manage Personal Nameservers
3. Preparing the Reseller Account. Description of WHM main functions
- How to use Feature Manager in WHM
- How to create a new package in WHM
- How to create a new cPanel Account in WHM
- How to change a password/contact email address for a cPanel account in WHM
- How to change a package for a particular cPanel account in WHM
- How to edit Resource Limits in WHM
- How to edit DNS Zone of a particular Domain Name in WHM
PACKAGE INFORMATION Welcome Guide EmailOnce your Reseller Hosting account is activated, you will receive a Welcome Guide Email containing the information about your hosting package, including WHM/cPanel access details, Addons, FTP details and other important references.
You can check an example of such an email right
here.
Email with AddonsIf you choose some additional services for your hosting account, or in case some of them are included into the package already like SSL Certificate or Private Nameservers, you will receive an additional email message containing the detailed information about them, for example IP addresses for Private Nameservers, etc.
You can also take a look at an example of such email message
here.
NOTE: A number of Addons may vary depending on the type of the Reseller package you choose. You can check available Reseller Hosting packages
here. To view full technical specification of the package, click on the Tech Specs link on the page.
PREPARING the DOMAIN NAMEOnce the hosting account is active, you will need to point the domain name to our nameservers or Personal Nameservers if such are included into the package. You will find nameservers in the Welcome Guide email after the package activation.
How to Manage Personal Nameservers
If you have Personal Nameservers included into your hosting package, you will need to register and set them on the side of your Domain Name Registrar.
NOTE: IP Addresses for Personal Nameservers are also provided in the Welcome Guide Email.
PREPARING THE RESELLER ACCOUNT. DESCRIPTION OF MAIN WHM FUNCTIONSOnce you receive the Welcome Guide email and get access to WHM, you can start learning WHM basics and get a few things done. Find the description of main WHM functions below.
How to use Feature Manager in WHMFeature Manager is an interface that allows creating a list of features that will be available for particular cPanel accounts.
In order to create a specific Feature List, do the following:
1. In WHM navigate to the
Feature Manager menu in the section
Packages2. Type in the name of the list you wish to create next to the
Feature List Name field and click on the
Add button:
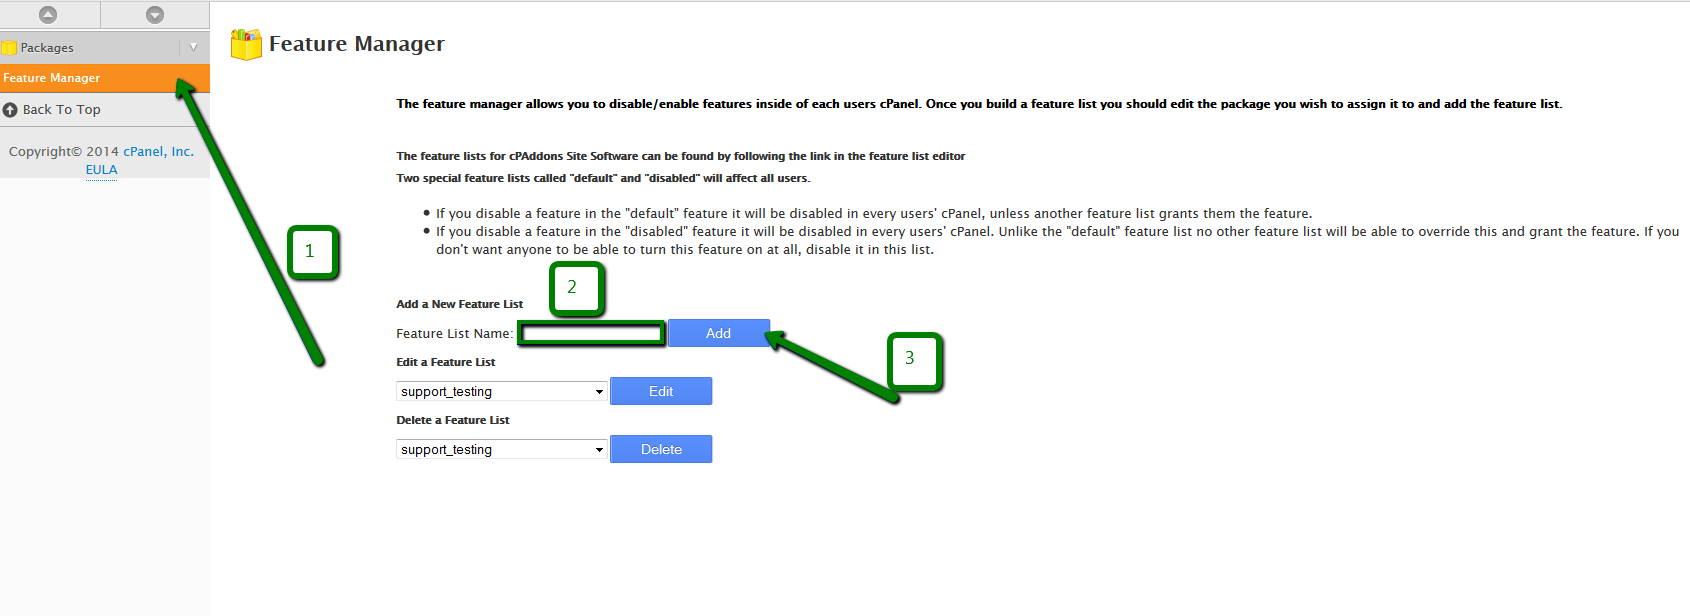
3. Once done, choose the newly created list from the drop-down menu next to the
Edit a Feature List field and click on the
Edit button:

4. You will be forwarded to the list of features available on our server. Simply pick up the required ones and click on
Save at the bottom of the page.
How to create new packages in WHMA
hosting package is simply a set of functions, limitations and resources each cPanel account may have within a Reseller Hosting Account. Basically, having different packages with a different set of functions and limitations allows providing a range of hosting accounts based on particular features.
NOTE: It is recommended to configure a hosting package prior to creating a new cPanel account in WHM to simplify further cPanel accounts management process.
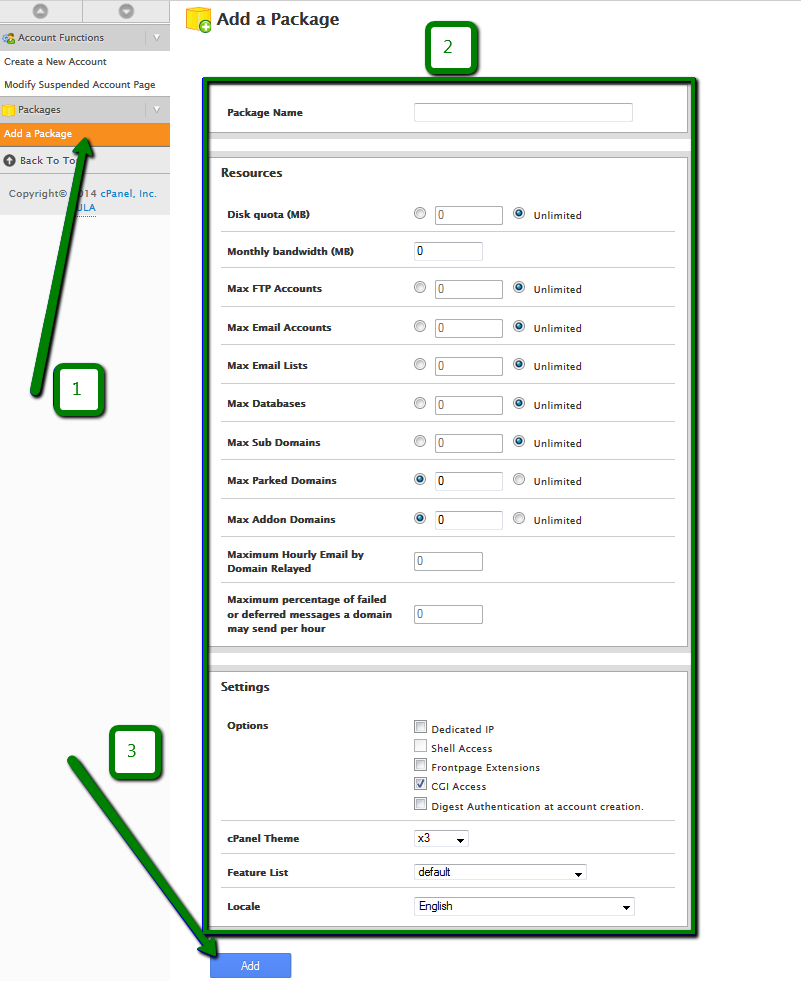
To create a new package in WHM, you will need to do the following:
1. Log into WHM using http://domain.com/whm or https://hostname_server/whm.
2. Navigate to the
Add a Package menu in the section
Packages.
3. Set appropriate quotas in the
Resources section.
4. Choose required settings for the package in
Settings, including Feature List.
5. Click on the
Add button:
 How to create new cPanel Accounts in WHM
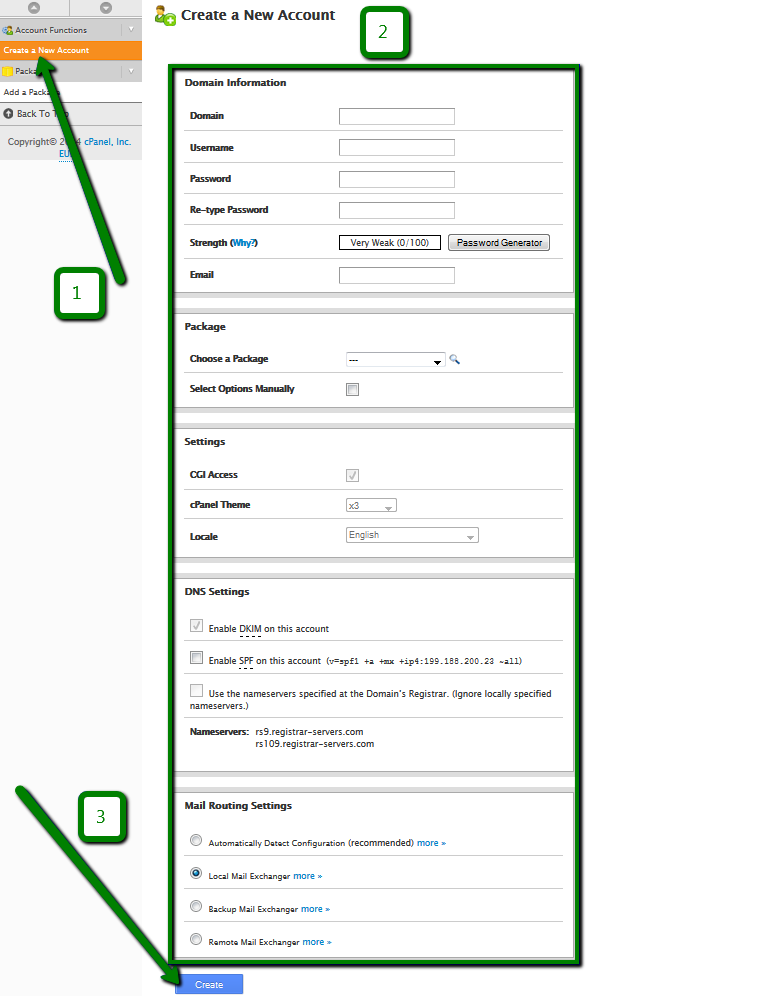
In order to create a fresh cPanel account in WHM you need to do the following:
1. In WHM navigate to the
Create a New Account menu in
Account Functions2. Fill in the gaps and choose appropriate settings in the following sections:
- Domain Information
- Package Settings
- DNS Settings
- Mail Routing Settings
3. Click on the
Create button:
 How to reset a password/contact email address for a cPanel account in WHM
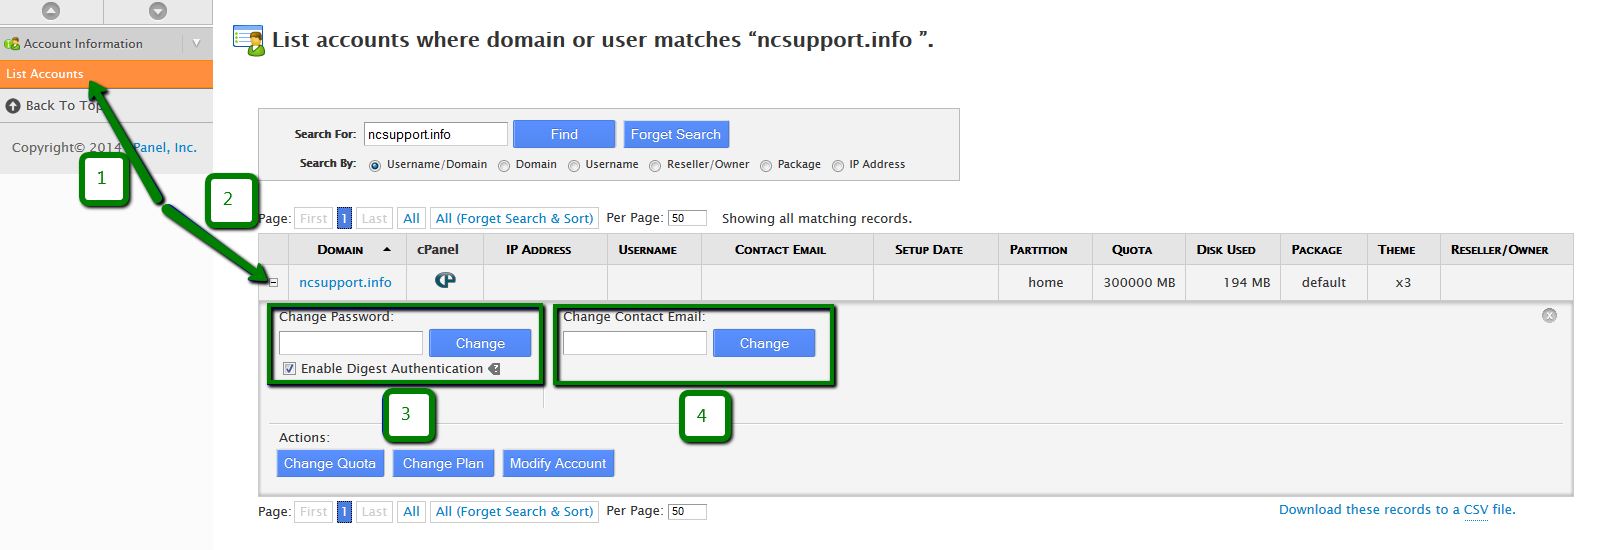
If you need to change a password or a contact email address for a particular cPanel account, you can do this in the following way:
1. Navigate to the
List Accounts menu
2. Click on '
+' next to the cPanel account you need to change the information for
3. Change the password or email account in corresponding fields and confirm by clicking on
Change:
 How to change a package for a particular cPanel account in WHM
In order to change a package for a cPanel account you will need to do the following:
1. Navigate to the
Upgrade/Downgrade an Account menu
2. Choose the account you wish to upgrade/downgrade in
Account Selection and click on the
Modify button:
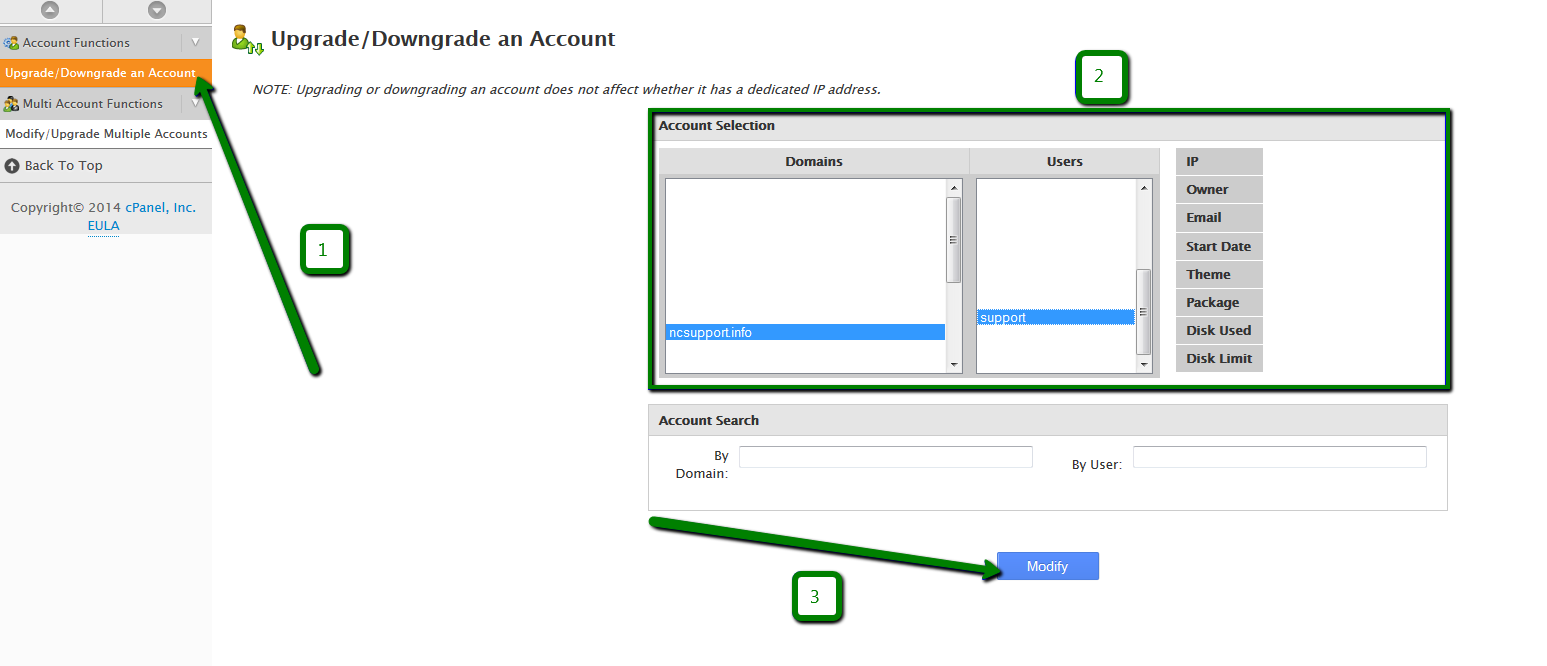
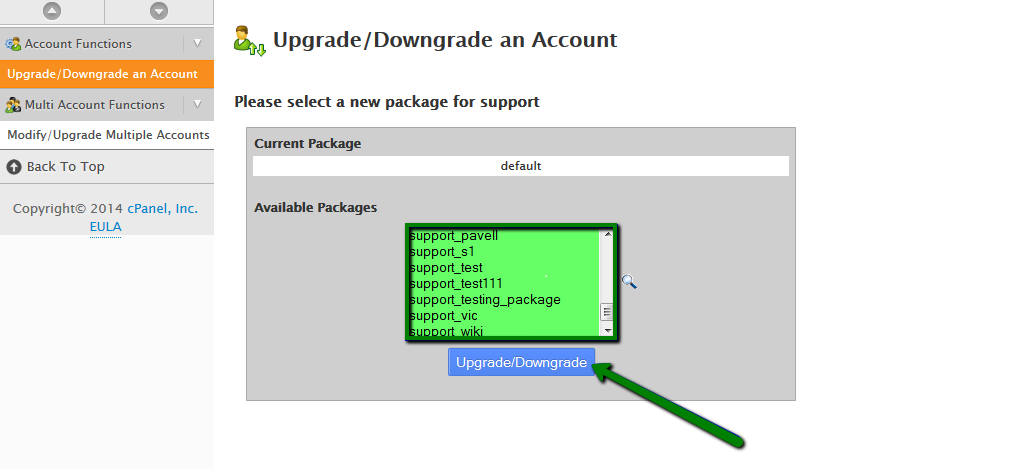
3. In the next windows you will need to choose the required package from the
Available Packages list and click on the
Upgrade/Downgrade button:
 How to edit Resource Limits in WHM
Resource Limits is a WHM function that allows allocating available system resources to cPanel users. It may be useful in order to prevent some accounts from overusing server resources.
Apart from resource limits stipulated by a package, it is possible to adjust the limits for a cPanel account particularly. This can be done in the following way:
1. In WHM navigate to the
Modify an Account menu
2. Choose the account you wish to adjust the limits for in the
Account Selection field and click on the
Modify button
3. You will be forwarded to thte account modification window, and specific resources can be adjusted in the
Resource Limits section accordingly.
How to edit DNS Zone of a particular Domain Name in WHMA DNS Zone is an administrative portion of DNS settings that belongs to a domain name.
In other words, every domain name has certain DNS settings and in order to keep them all together, a DNS Zone file was designed. A DNS Zone can be easily edited via WHM >> Edit DNS Zone menu.
To edit DNS Zone, follow the steps below:
1. In WHM navigate to the
Edit DNS Zone menu on the left-side bar.
2. Choose the account you wish to adjust the settings for in the
Choose a Zone to Edit list and click on the
Edit button:
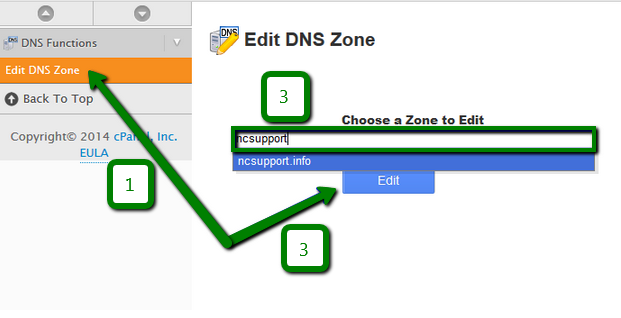
3. You will be forwarded to the DNS settings modification window where different DNS records types including A, CNAME, TXT, SOA, NS, MX etc. can be adjusted accordingly.
More details on this tool can be found
here.


